
A Step-by-Step Guide for Homesteaders & Investors
Buying raw land is different from buying a house: it requires specialized research, realistic budgeting and careful due diligence. This guide synthesizes field experience and practical steps to help first‑time buyers acquire raw agricultural or residential–agricultural land in 2026. It is organized as an operational checklist you can follow from the first search to the day you take physical possession.
Primary audience: aspiring homesteaders, small‑scale farmers, and buyers seeking undeveloped lots.
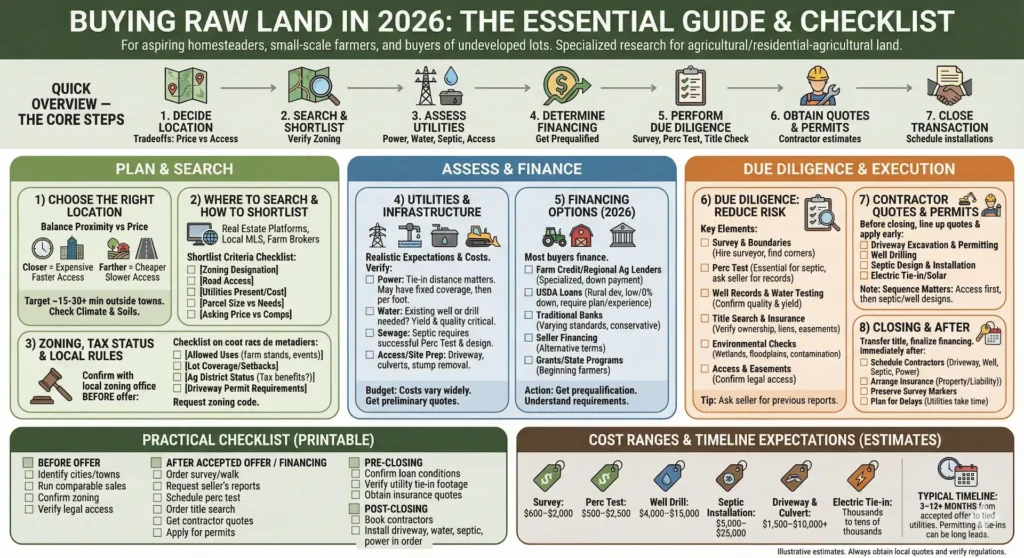
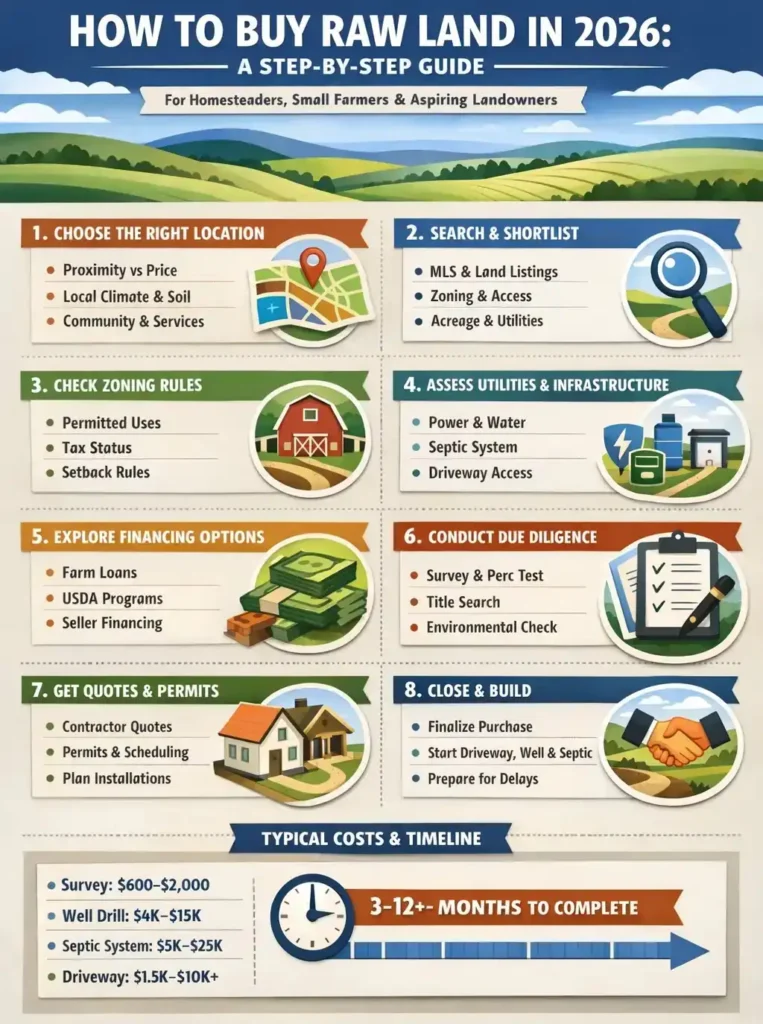
Quick overview — the core steps
- Decide location and proximity preferences (tradeoffs: price vs access).
- Search and shortlist properties.
- Verify zoning and permitted uses.
- Assess utilities and infrastructure (power, water, septic, driveway access).
- Determine financing options and get prequalified.
- Perform due diligence: survey, perc (percolation) test, well records, title search and environmental checks.
- Obtain contractor estimates (driveway, well, septic, electric tie‑in) and apply for permits.
- Close the transaction and schedule installations.
Each step below explains how, why and what to budget for.
1) Choose the right location (what to balance)
Selecting where to buy is the first and most strategic decision. Consider: proximity to services, market access, climate, and local land values.
- Proximity vs price: Land closer to towns and cities is more expensive but gives faster access to supplies, healthcare and customers for agri‑business. Expect to search ~15 minutes outside a small city or ~30+ minutes outside a larger city when hunting for farmland or residential‑agricultural lots.
- Map analysis: Use maps to find corridors with low development density between towns — these are where agricultural lots are most likely to be available.
- Local climate & soils: Confirm growing-season length, frost dates and general soil types for your intended uses.
- Community & services: Short driving times to a village or small city improve logistics (supplies, visitors, emergency services).
2) Where to search and how to shortlist
Common search tools: national real estate platforms (filter to land & lots), local MLS, agricultural land brokers, farm‑only listings and town or county land sales. Also attend local town board and farm bureau meetings to find off‑market opportunities.
Shortlist criteria to apply immediately:
- Zoning designation (agricultural, residential‑agricultural, etc.)
- Access to road (public road vs private access easement)
- Utilities present (well / power / septic) or cost to install
- Parcel size vs your needs (note: small acreage — even 1/3 to 1/10 acre — can support family food production)
- Asking price vs comparable sales in the area
3) Zoning, tax status and local rules
Zoning determines what you can legally do on the land. Agricultural or residential‑agricultural zoning typically grants the greatest flexibility for small farms, farm stands and agritourism. Confirm the following with the local zoning/town office before you offer to buy:
- Allowed uses (farm stands, events, animal limits)
- Lot coverage and setback requirements
- Whether the parcel sits inside a designated agricultural district (possible tax benefits)
- Driveway permitting requirements for county or state roads
Action: call the town zoning officer and request the town charter or zoning code for the parcel. Do this prior to closing.
4) Utilities and infrastructure — realistic expectations & costs
Raw land typically lacks one or more utilities. The three utilities to verify are:
- Power — tie‑in distance to nearest pole matters and often determines who pays. Utilities may cover a fixed footage (e.g., 300–500 ft); beyond that you typically pay per foot for line extension and trenching.
- Water — does the parcel have an existing well? If not, budget for a well drill and pump. Well yield and water quality are critical.
- Sewage — a septic system requires a successful perc/percolation test and engineered design; failure or poor soils can add thousands of dollars.
Additional infrastructure:
- Driveway and access: excavation, culverts and permits (county roads often require a permit).
- Site preparation: stump removal, grading and erosion control.
Budget note: costs vary widely by state and local site conditions. Obtain preliminary quotes from local well drillers, septic designers and excavators while your loan is processing.
5) Financing options (what to expect in 2026)
Most buyers do not pay cash. Financing options include:
- Farm Credit and regional agricultural lenders: they specialize in raw land and farmland loans. They may require conventional loan documentation (bank statements, tax returns) and typically expect a down payment (often 20% or more), but they may not require prior farming experience.
- USDA (rural development) loans: can include low‑down or 0%‑down options but often require a farming plan, prior farming experience or participation in an apprenticeship/mentorship program.
- Traditional banks or credit unions: can finance land but underwriting standards vary and many banks are conservative on raw land.
- Seller financing: possible alternative when conventional financing is unattainable — structure and terms vary.
- Grants and state programs: some states offer programs to support beginning farmers or conservation‑minded buyers.
Action: get prequalification from the lender(s) you plan to use. Understand their down‑payment, documentation and timeline requirements.
6) Due diligence — surveys, tests and title work
Due diligence is the most risk‑reducing part of the purchase. Key elements:
- Survey & boundary verification: hire the town surveyor or a licensed surveyor to walk the parcel, confirm boundaries and identify encroachments. Survey costs commonly range from a few hundred to a few thousand dollars depending on region and parcel complexity.
- Perc (percolation) test: assesses suitability for a septic system and is expensive to redo — ask the seller if recent tests exist.
- Well records & water testing: confirm whether an existing well meets your needs; water quality testing may be necessary.
- Title search & title insurance: verifies ownership and identifies liens, easements and covenants. Title insurance protects you against hidden title defects.
- Environmental checks: depending on location, check wetlands, floodplain maps, and any known contamination records.
- Access & easements: confirm legal vehicle access (public road or deeded easement) and any shared access agreements.
Tip: ask the seller for previous surveys, perk tests and well reports — these can save significant cost and time.
7) Contractor quotes, permits and the installation sequence
Before closing, line up quotes for major site work:
- Driveway excavation & permitting (if required by county)
- Well drilling (if no usable well exists)
- Septic design & installation (after successful perc)
- Electric tie‑in or solar installer (ask your electric utility what distance they cover)
Sequence planning matters: in most cases you will need driveway access before heavy equipment, and the septic and well designs before final grading and building placements.
Permits: pull required permits early (driveway, septic, building) — some utilities and county offices take weeks to months to process applications.
8) Closing logistics and what to expect after closing
At closing you transfer title and finalize financing. Immediately after closing:
- Schedule contractors to install driveway, well, septic and electric. Keep copies of permits and codes on file.
- Arrange for insurance (property and liability) if you will host visitors or run agritourism activities.
- Preserve survey markers and record the survey with the county if required.
Plan for delays: electric tie‑ins and utility trenching frequently take months—communicate closely with utilities and contractors.
Practical checklist (printable)
Before offer:
- Identify cities/towns to be near (15–30+ minute radius)
- Run comparable sales for parcels in the area
- Confirm zoning designation with town
- Verify legal access and road frontage
After accepted offer / while getting financing:
- Order survey and boundary walk
- Request seller’s perk tests, well reports, surveys
- Schedule perc test if seller has none
- Order title search and consider title insurance
- Get contractor quotes (driveway, well, septic, electric)
- Apply for required permits (county/town)
Pre‑closing:
- Confirm loan conditions and timeline with lender
- Verify utility tie‑in footage with electric company
- Obtain insurance quotes
Post‑closing:
- Book contractors and confirm permit timelines
- Install driveway, water, septic and power (in that order as conditions allow)
Cost ranges & timeline expectations (very general estimates)
These are illustrative and will vary by region. Always obtain local quotes.
- Survey: $600–$2,000 (varies by parcel and local rates)
- Perc test: $500–$2,500 (depends on hole count and region)
- Well drill: $4,000–$15,000 (depends on depth and geology)
- Septic installation: $5,000–$25,000 (site and system dependent)
- Driveway & culvert: $1,500–$10,000+ depending on length and site prep
- Electric tie‑in / pole extension: thousands to tens of thousands depending on footage
Typical timeline: 3–12+ months from accepted offer to fully tied utilities. Utility tie‑ins or permitting can be the longest leads.